Little Mermaid Walkthrought
Let’s keep tailing Ariel. In The Little Mermaid on NES (yep, that cartridge that often flaunted “Ariel The Little Mermaid,” while most of us just called it “Disney’s Little Mermaid”), success lives in the little things: the bubble at just the right angle, the right chest at the right time, the exact moment to snag a baddie and hurl them into a blockade. Basics first: trap with a bubble, pick the enemy up, then toss them into rocks, coral, and shell barricades; pull hearts and power/range upgrades out of chests. Don’t rush—the game is generous with safe nooks to catch your breath, and underwater currents are readable by the faint bubbles in the background layer. From here it’s level by level, step by step.
Sea Lagoon
Head right to the first chest—there’s often an early bubble upgrade inside; without it, everything just takes longer. The next screen teaches rubble work: nab the nearest fish, throw it into the cracked coral, and a path opens to another chest. In current zones, hug ledges: skim the lower edge, watch for a window between jellyfish and sea urchins. Whenever a wall looks “blank,” try a throw—there are a couple of fake panels in the lagoon hiding a heart. Before the boss are three small rooms: in the first, boomerang starfish—don’t chase them, bubble them on the turn; in the second, a vertical shaft with heavy pull—climb in bursts from ledge to ledge; in the third, a thin bridge packed with rays—extra bubble range shines here. The boss sticks to a simple loop: bait the strike, drift off on a diagonal, grab a small add, and bean the head. Two or three clean hits end it.
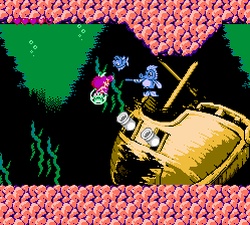
Sunken Ship
The holds are trap-happy. Broadside cannons fire in volleys: hide in the gaps between shots—don’t try to “muscle through.” Make sure to open the chests on the starboard side—one gives a range upgrade that trivializes the pendulum-anchor room. In the angled-plank passage, clear the ceiling first: tag a ray, toss it into the upper decking—there’s a secret pocket above with a heart. The whirlpool room is taken in “steps”: stand in the lower niche, wait for the funnel to ease up, then short-dash into the left alcove with the chest—inside is either a life or bubble power. Before the boss, a corridor with ceiling crabs: don’t swim under them all at once; peel them one by one or you’ll eat a “crossfire.” On the boss, hold mid-range: the broadside attack is telegraphed, and the throw window opens after the volley. Scoop small fry, don’t get greedy—one accurate toss beats face-tanking every time.
Ice Cavern
This one is all timing and ceilings. Icicle stalactites drop as soon as you enter their trigger—edge in, force the fall, back off half a body, then move through the clean lane. In the tight vertical shaft the current drags you down—climb it like stairs: ledge, bubbled enemy, another ledge. Next, a hall of drifting ice floes: ride the lower boundary and thread the gap between jellyfish; with the range upgrade, pick threats off early. In the right wall before the long corridor there’s a brittle ice seam—one throw opens a pocket with a double chest (heart + shell). The room with “freezing” jets—don’t panic: jet on—step back; jet off—slip through. The boss cruises in an arc and fires low ice shots; hover at mid-height to snatch small enemies and sling them on a tangent. Whatever you do, don’t box yourself in—there’s less room to juke near the walls.
Volcanic Grottoes
Patience saves the run here. Geysers work in cycles: count “one-two-three—quiet,” then advance in short bursts. In the first big room, a chest is buried on the floor behind breakable rock—throw an enemy at a clean 45°, or it’ll ricochet into lava. In the corridor with bubble columns, ride the lift: there’s a heart pocket up top and a safe reset zone below. The room with “spitting” rocks is solved by range—don’t move in, shoot from behind a bump. Before the boss, a long zigzag shaft: each bend has a safe “pocket” to dodge fireballs; move pocket to pocket and don’t skip the chests—one often tops you up before the arena. On the boss, watch the platforms: lava splashes trigger a wave from below; rise half a body and catch the throw window. Two or three crisp “assists” straight to the dome speed the fight up nicely.
Ursula’s Lair
The finale is more maze-y. The route is loosely looped: if you hit a violet wall with no visible exit, look for a hairline crack in the coral and break it with an enemy. Rooms with electric eels (yep, Flotsam and Jetsam) are all rhythm: pulse—pause—pulse; go on the second “quiet.” In the narrow hall with two side jets, don’t force it—grab the nearest jellyfish and cover half the distance, holding it as a “shield” until the window clears; release, re-bubble, and finish the toss to the wall. The platform before the boss is your last heal: to the right there’s a pocketed chest behind a double barrier—bring a foe from the adjacent room and lob it diagonally. On Ursula, don’t idle in the center: when the cauldron lights, the edges leave “pockets” without lightning. The plan is simple and reliable: sidestep, snag a minion, drift down on a diagonal to dodge the discharge, then bean her head as she dips toward Ariel’s line. Shooting straight is useless—only precise throws count. After each clean hit, change altitude—bolts love to strike your previous spot.
A few general tricks that really carry this Ariel adventure. First: save health wherever range can do the work. Any bubble upgrade is priority, especially before anchor and geyser rooms. Second: check “dead” corners—the game loves to tuck chests a tile off-screen; swim up, chuck an enemy, claim the bonus. Third: currents telegraph ahead—watch the quiet background bubbles and plan your route. And finally, take it slow: The Little Mermaid (or, as we called it back then, just “Ariel” by Capcom) rewards clean play. With that mindset, every room falls into place, and every boss is about a clear rhythm where you lead the dance instead of flailing to someone else’s beat.